

Easy Homemade Lotion Recipe that’s Non-Greasy for Face and Body
This homemade lotion recipe is non-greasy, absorbs quickly, and all-natural!
If you want the ultimate non-greasy homemade lotion recipe, you want it to be quick, easy, and have accessible ingredients, right? Well, now you’ve found it!
This recipe is great for year-round dry skin problems. You can use this lotion on your face, legs, elbows, wherever you need!
I use it every day on my face and my skin loves it. And I’m confident that after you try this DIY lotion recipe, you may never buy regular lotion again! I haven’t bought lotion in several years and I haven’t looked back.
This post may contain affiliate links. Learn more on my disclaimer page.
What is the Best Natural Lotion?
Before we jump into the recipe for this lovely homemade moisturizer for dry skin, I have to say that making your own lotion isn’t for everyone. It’s probably one of the most intense DIYs on this website.
Unless you want your lotion to last longer than a few weeks, there’s really no such thing as an easy homemade lotion. And I’m going to walk you through exactly why that is while giving you the simplest lotion possible that you can successfully make on your first try.
But if you look through this recipe and decide that DIY lotion isn’t for you, that’s totally fine! There are plenty of natural lotions on the market that will get the job done just fine.
This unscented lotion by the brand Everyone is very similar to this homemade lotion recipe, and it can be used on your face and body! Not to mention it gets a rating of one on the EWG scale. Check it out for yourself below:
How Do You Make Lotion from Scratch?
There is a minimum of six ingredients in this non-greasy homemade lotion, depending on how many oils you want to use. We’re only going with what you need here, and no extra fluff!
One ingredient that I’m purposefully leaving out is coconut oil. While it’s being hailed as this amazing do-it-all ingredient, it’s not the best thing for your skin, especially your face.
Don’t get me wrong, I love coconut oil. However, there are better options out there for your skin. A good face lotion recipe should include much lighter ingredients.
Coconut oil may be amazing, but it’s a very heavy oil that takes a long time to soak into your skin. I wouldn’t recommend putting it all over your face because it can easily clog your pores. Non-greasy lotion should never include coconut oil for this reason!
Of course, this completely depends on your skin type. I’ve seen people use coconut oil on their face perfectly fine. But I’ve also seen people develop some serious breakouts from their skin feeling so congested.
I also want to point out that I know the lotion by Everyone has coconut oil in it. I’ve tried this lotion myself and I can verify that it hasn’t clogged by oil-prone pores. Brands usually know how to formulate lotions with coconut oil without making the product too heavy. But doing it at home can be a different story.
If you’re new to the natural skin care world, I would do yourself a favor nix putting coconut oil on your face. Especially if you plan to use this as a DIY face moisturizer. It could save you some time (and acne!) just by staying away from it.
How Do You Make Homemade Lotion Not Greasy?
What makes this homemade lotion so great? The secret is lightweight oils and small amounts of some heavier moisturizers. One of these heavy moisturizers is raw Shea butter. But don’t think about forgoing it altogether! This creamy lotion recipe has Shea butter to help the moisture stay all day long.
When I made my first batch of lotion, I was apprehensive to put this on my face. But I found that it mixed evenly and absorbed into my skin faster than I thought! My skin wasn’t overly greasy at all, considering I have very oily skin.
In fact, my skin felt less oily throughout the day because it had all the moisture it needed. This lotion quickly turned into my favorite homemade face cream.
Emulsifying wax also adds to the moisture, but it’s there primarily to give it that “lotion-y” texture and to keep everything from separating. It also creates a nice barrier on the skin to lock everything in place!
If you have no idea what emulsifying wax is, there’s nothing to panic about. It’s the perfect alternative to homemade lotion without beeswax.
You can get it online no problem, and it’s crucial for a good batch of lotion that will last you a long time. For this to happen, you’re going to need a natural preservative. Yes, there are such things as natural preservatives!
A Word on Natural Preservatives in DIY Beauty
When I first published this lotion recipe, it quickly became one of my top performing posts on Essential Moves to Wellness. While I originally designed this lotion to be super simple, I realized that there was one crucial step I missed.
I realized that this recipe needs a preservative.
Without a preservative, any DIY beauty recipe that has a water-based ingredient will grow bacteria and mold after just a few days. This can be disastrous for people with a compromised immune system, among other things.
If you were to get lotion without a preservative in your eyes or mouth, it’s possible you could develop sickness or infection.
That’s why you’ll find my favorite natural preservative, Leucidal Liquid SF, on the ingredient list. Leucidal Liquid SF is a kind of probiotic that’s used to make fermented foods like kimchi.
These little microorganisms make the environment of the lotion too acidic for mold and bacteria to grow, making it last much longer. Not to mention, Leucidal Liquid SF will emulsify into the perfect lotion texture that won’t involve any use of a blender or beater.
What Are Emulsifiers in DIY Beauty Products?
Emulsifiers are a special bonding agent that will keep everything mixed evenly for the duration of the product’s lifespan. Emulsifying wax pellets is one of these agents that we’ll be using in this lotion recipe, which is nothing more than a vegetable-based wax.
Beeswax is a very common ingredient used to give lotion its texture, and you’re totally welcome to use it in a pinch! Just keep in mind that everything will separate over time, and you will have to re-blend it periodically.
But you won’t have to do this with emulsifying wax pellets!
Just about any lotion or cream you’ll make has a water-based ingredient, which in the case of this homemade lotion is aloe vera. I noticed that the aloe would float to the surface of my lotion after a few weeks, so I had to re-blend it back together with a handheld mixer.
This would result in somewhat lumpy lotion that lost its silky texture over time. In order to avoid this, I highly recommend using emulsifying wax instead of beeswax if you can get ahold of it. You can easily find it on Amazon.
Now that we know all about preserving our lotion, let’s get into why the oils I have below are so great for your skin. There are so many options out there! And most of them are way better than coconut oil.
The Best Carrier Oils for DIY Lotion
The rest of your recipe, other than aloe vera gel, emulsifying wax, and Shea butter involves carrier oils. A carrier oil is safe for any skin type and is super nourishing. It’s often a diluting agent for more potent essential oils.
I chose jojoba oil for my carrier oil because it’s very similar to my skin’s oils, and it’s lightweight! You can get it anywhere online and at health food stores, but my personal favorite is from Rocky Mountain Oils.
Another great option for your carrier oil is sweet almond oil. It’s full of essential fatty acids that strengthen the elasticity of your skin to keep it looking moisturized and youthful. It’s also very lightweight and absorbs quickly into your skin.
You can read my Rocky Mountain Oils review if you want to know more about where I get my essential oils. They’re one of the most honest companies I’ve come across when it comes to their ingredient lists. Plus, you can get free shipping anywhere within the U.S. over $25.00.
The Best Essential Oils for Homemade Lotion
An optional part of this recipe is adding your favorite essential oils. You can add them simply for their aromatherapy benefits, or to help with any skin ailments. They can help treat anything from dry skin to eczema.
You can totally leave out essential oils if you wish. In fact, I would highly recommend this if you’re dealing with extremely sensitive skin. You can learn why in my essential oil safety guide.
I went with lavender and mint because they’re my personal favorite scents, but they have good benefits too! Lavender is very soothing and moisturizing, and peppermint is invigorating and cooling for inflamed skin.
Some more essential oil options include:
- Tea tree—Antibacterial, great for acne
- Roman chamomile—Calms dry or inflamed skin
- Rose—Hydrates and anti-aging
- Cedarwood—Great for stubborn acne
- Orange—Anti-inflammatory and great source of vitamin C
- Frankincense—Anti-aging
- Argan oil—Nourishing, anti-aging, evens skin tone. **Not actually an essential oil. Could be used as your carrier oil if you wish.
I would use any combination of two to three of the essential oils listed above!
I used straight Argan oil on my face for the first few years of my clean beauty journey and it worked great. It’s one of those oils that’s not potent enough to be diluted but still pretty powerful, which is why I included it on this list. Now let’s get into the recipe!
My Non-Greasy Homemade Lotion Recipe | How to Make Body Lotion from Scratch
Before we begin, I want you to think about how much lotion you’ll need. Yes, this lotion has a preservative, but it will still go bad after about six months.
A little bit of this stuff goes a very long way, so I recommend you look at the chart below and assess how much lotion you think you’ll go through in a six-month period.

When I made this lotion for the first time, I went with the largest amount and barely put a dent into it. So I cut it in half and things got a bit better, but I hated how much lotion I had to throw out.
I cut it in half again, and I’m finally happy with the amount! I did this because I go through lotion at the rate of a snail, and it’s better to make lotion in small batches anyways.
If you tend to use a lot of lotion and your household goes through it pretty quickly, I recommend you use the largest amount, or the full mason jar. If it’s just you and still go through a lot of lotion, go with the middle amount.
Or if you’re like me and go through lotion slowly, make the smallest batch. I only use about half a nail’s worth of it on my face every day. You can see how little I use it in my Lotion Highlight on my Instagram page.
DIY Lotion Recipe

This DIY lotion recipe is perfect for sensitive skin! It can even be used on both face and body for ultimate moisture.
Materials
Instructions
- Measure out your aloe vera gel and scoop into a clean, empty mason jar.
- Measure your carrier oil, Shea Butter, and emulsifying wax pellets and place in another clean and empty mason jar.
- Create a double-boiler by adding water to a small to medium-sized saucepan and put your mason jars in the water before you bring to a boil. This will prevent the glass from shattering.
- Allow the oil ingredient jar to completely melt together. I also recommend covering your aloe vera jar so it doesn’t evaporate away.
- Once everything is melted, carefully removed the jars from the water and place on a clean cloth for a moment to cool. Use a thermometer to make sure that they are roughly the same temperature.
- Add in your essential oils of choice.
- After a couple minutes of allowing your mixtures to cool, pour the hot aloe vera into the oil mixture and stir together with a whisk. It will bubble and turn white, so don’t panic.
- Let the mixture sit for about 15-20 minutes so it can cool to a proper temperature. For this particular Leucidal Liquid SF, it is safe to add when the temperature of the lotion dips below 104 degrees Fahrenheit. Test the temperature periodically, and when it’s cool enough, add in the preservative and mix thoroughly. The lotion will thicken as it cools.
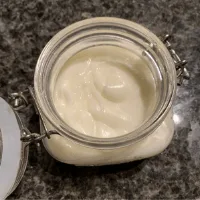
- Scoop the lotion into your favorite container and use once completely cooled! Store in a cool, dry place for up to six months.
Notes
This is the recommended smallest amount of lotion you can make to prevent the batch from going bad before you finish it. Trust me, a little bit of it can go a very long way! You can use it on both face and body.
My Tips and Tricks with This DIY Lotion Recipe
I’ll admit that making your own lotion is something that might not turn out great the first time. When I first made this, I boiled everything together at once on accident and the consistency didn’t feel right.
Then I wasn’t too sure about how much Leucidal Liquid SF to add, and I didn’t add enough.
But if you take anything from this section, it’s that you should always read the instructions before using your preservative!!
Each individual preservative from certain brands will work under a certain temperature with a certain amount. If you use the Leucidal Liquid SF I linked here and above, then you can use my measurements for it. However, if you use a different preservative, use the directions for that instead.
Most preservatives will require that it consist of a certain percentage of the lotion. I was able to calculate that half a tablespoon of Leucidal Liquid SF is approximately 4% of the middle amount for this recipe, which is what the label called for. So be careful and follow instructions!
How to Avoid Chunky Lotion that Isn’t Emulsifying
Another problem I’ve seen with making lotion is that sometimes it won’t emulsify properly. The easiest fix for this issue is to use a hand blender (the kind of blender that’s used to get rid of chunks in soup like this one).
This will blend everything together and make the lotion thicken up better. If you’re still having trouble after that, it might be best to recalculate your measurements for your preservative.
You might need to add more or less, depending on your results. Or, if you simply want thicker lotion overall, I suggest adding in more emulsifying wax the second time around.
Final Thoughts on this Non-Greasy Homemade Lotion
Now that I’ve mastered this lotion recipe, I’m confident that I’ll never buy my own lotion again. And there are so many ways to customize it with essential oils!
One recipe I really want to try is vanilla essential oil with cocoa butter instead of raw Shea butter for a cookie-themed lotion.
You can put this lotion on any part of your body that needs moisture. Like I said, it may seem a little heavy for your face, but trust me when I say that your skin will love it. I have an oily skin type and I didn’t break out or feel greasy at all!
My legs absolutely love it for summer as well. It works great right after you shave, and your skin could use a little extra moisture. So go ahead and make your own personal lotion. I’ll be chilling here in the meantime.
Would you try this DIY lotion recipe? Let me know in the comments below!
Also related to Homemade Lotion:
Homemade Body Lotion for Glowing Skin
Pin this image for later!
 12")

 16")

I can’t use regular lotion cause I’m allergic to formaldehyde and it’s derivatives so made your lotion recipe and love it.
Can I add anything to create a sunscreen version?